How to Sharpen Kitchen Knives (The Right Way)
A dull knife is more dangerous than a sharp one. It takes more force to cut, it slips off food instead of biting in, and that’s when accidents happen.
The good news: sharpening kitchen knives isn’t as intimidating as it looks. Whether you’ve never sharpened a blade before or you’re looking to refine your technique, this guide covers every method from beginner-friendly pull-throughs to traditional whetstones.
Not sure which knives you actually need in your kitchen? Check out our guide to the essential kitchen knives every home cook should own first, then come back here to keep them sharp.
How to Tell If Your Knife Needs Sharpening
Before you grab a sharpener, it helps to know where your knife stands. Here are two quick tests you can do right now.
The paper test: Hold a sheet of printer paper by one edge and try to slice downward through it with your knife. A sharp knife will cut cleanly with little effort. A dull knife will tear the paper or slide off without cutting.
The tomato test: Place a tomato on your cutting board and try slicing without applying downward pressure. Let the weight of the knife do the work. If the blade glides through the skin cleanly, you’re in good shape. If it crushes or slides, it’s time to sharpen.
Other signs your knife needs attention:
- Food tears instead of slicing cleanly
- You’re pressing harder than usual to make cuts
- The blade slips off the surface of onion skins or tomato skins
- Chopping herbs bruises them instead of cutting them
If any of those sound familiar, keep reading.
Honing vs. Sharpening: What’s the Difference?
This is one of the most common points of confusion, and understanding the difference will save you a lot of time.
Honing realigns the edge of your blade. Think of your knife’s edge as a thin strip of metal. With regular use, that edge doesn’t disappear. It bends and folds over to one side. Honing straightens it back out. It’s maintenance, not repair.
Sharpening removes metal to create a new edge entirely. Over time, honing won’t be enough because the edge has worn down too much. That’s when you need to sharpen, which grinds away a small amount of steel to form a fresh, clean edge.
Think of your knife’s edge as an inverted V shape. When you sharpen, you’re removing material from one side of that V until you push a tiny bit of metal past the apex and over to the other side. That little ridge of pushed-over metal is called a burr.
Once you feel it, you switch sides and repeat. Then you alternate with finer abrasives until the edge is refined and razor sharp.
How often to do each:
- Hone before or after every cooking session (takes 30 seconds)
- Sharpen every few months, or when honing no longer restores the edge
How to Sharpen Kitchen Knives with a Whetstone
Whetstones (also called sharpening stones) give you the most control and the best results. They take a bit of practice, but once you get the hang of it, nothing else produces as clean an edge.
There are a few types of whetstones you’ll come across:
- Water stones (Japanese style): Soak in water before use. Fast-cutting and available in a wide range of grits. Popular with enthusiasts.
- Oil stones (Arkansas stones): A traditional American option. Use with mineral oil. Affordable and durable.
- Diamond plates: Don’t need soaking. Cut aggressively. Good for very dull knives.
Which should you use for lubrication? Some people use water, some use oil, and some use nothing at all. There’s no single right answer. The oil or water helps prevent tiny metal particles from clogging the pores of the stone, but plenty of experienced sharpeners work dry.
If you’re starting out, a combination stone with two grits (like a 1000/6000 water stone) is a great first purchase. Or a classic three-sided Arkansas stone set gives you coarse, medium, and fine grits in one unit.
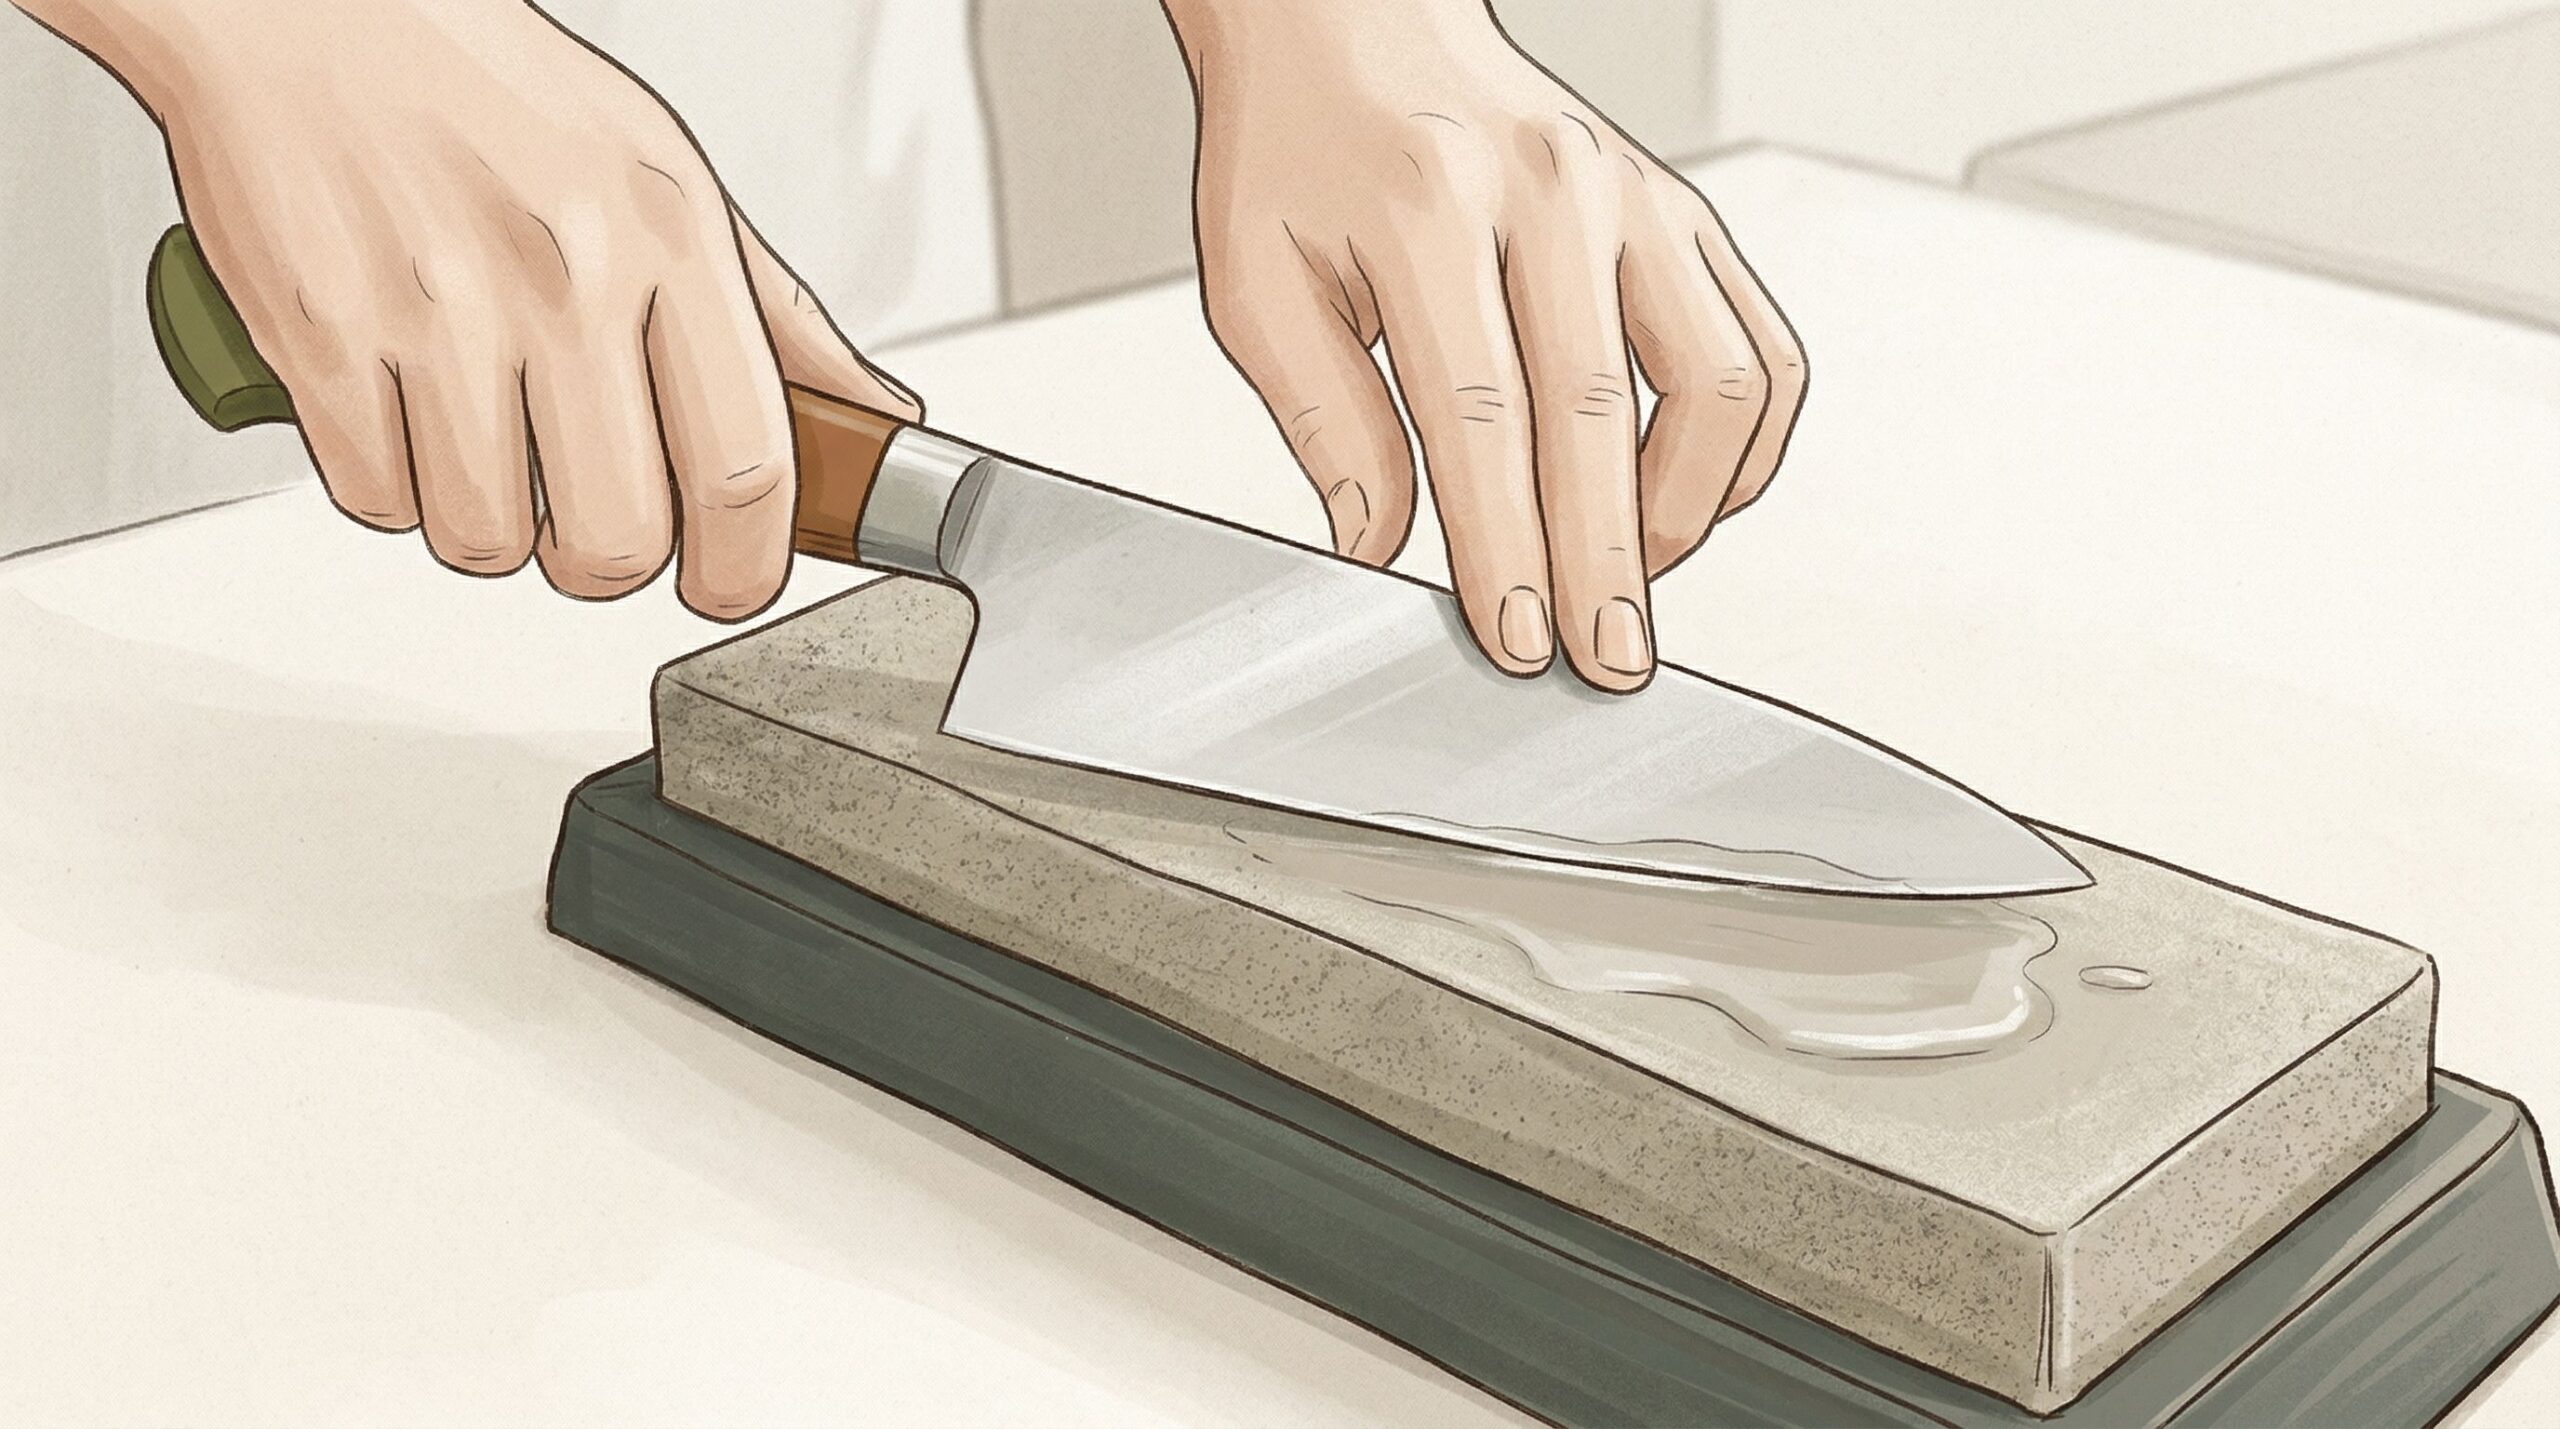
Step by step: sharpening with a whetstone
- Prepare the stone. If you’re using a water stone, soak it for 5 to 10 minutes until bubbles stop rising. For an oil stone, apply a thin layer of mineral oil to the surface. Diamond plates can be used with water or dry.
- Set your angle. Most Western kitchen knives come with a 20-degree angle per side (40 degrees inclusive). Japanese knives are typically 15 degrees per side. If you’re not sure, 20 degrees is a safe default. Need a visual reference? It’s roughly the angle of a matchbook standing on its spine against the blade. Read more about how angles differ between Western chef knives and Japanese santoku knives.
- Start on the coarse grit. Place the blade on the stone at your chosen angle. Using moderate pressure, push the edge forward across the stone in a sweeping motion from heel to tip. Some people prefer a circular motion. Either works.
- Sharpen until you feel the burr. After several passes on one side, run your finger carefully along the opposite side of the edge (away from the sharp side). You’ll feel a slight ridge of metal. That’s the burr, and it means you’ve sharpened enough on that side.
- Switch sides. Flip the knife over and repeat the same process until you raise a burr on the first side.
- Alternate and refine. Switch to your finer grit stone. Make a few alternating passes on each side (one stroke left, one stroke right) to remove the burr and polish the edge.
- Clean and test. Rinse the knife and stone. Dry the blade completely. Test the edge with the paper test.
A tip we’ve picked up: practice on your old, inexpensive knives first before working on your nicer blades. It takes a bit of muscle memory to hold a consistent angle, and there’s no reason to learn on your good chef’s knife.
If you’re looking for your first stone, a Smith’s combination stone is a solid starting point. For Japanese-style sharpening, water stones are the standard. And if you prefer the traditional American approach, Arkansas stones have been the go-to for generations.
How to Use a Pull-Through (Manual) Knife Sharpener
Skill level: Beginner
Time: 1 to 2 minutes
If you want sharp knives without learning whetstone technique, a pull-through sharpener is the fastest way to get there. These devices have built-in angle guides, so you don’t need to worry about holding a precise angle yourself.
Step by step
- Place the sharpener on a stable surface. A cutting board or countertop works fine. Some models have non-slip bases.
- Start with the coarse slot (if your sharpener has multiple slots). Place the heel of your knife in the slot and pull it toward you in a smooth, steady motion from heel to tip.
- Repeat 3 to 5 times on the coarse slot, then switch to the fine slot for the same number of passes.
- Rinse and dry your knife. Test the edge.
The tradeoff: Pull-throughs are fast and easy, but they remove more metal per session than a whetstone. They also offer less control over the edge angle. For quick touch-ups between proper sharpenings, they’re great. For your best knives, consider learning to use a whetstone.
There are plenty of pull-through sharpeners at different price points. Look for one with at least two slots (coarse and fine) for the best results.
How to Use an Electric Knife Sharpener
Skill level: Beginner
Time: 3 to 5 minutes
Electric sharpeners do most of the work for you. They use motorized abrasive belts or wheels with built-in angle guides, making them the most hands-off option.
We like the Work Sharp Culinary E5 for home kitchens. It uses abrasive belts instead of diamond plates, which produces a very clean edge. It’s also made in the USA.
Step by step
- Start with the most aggressive cycle if your knife has never been sharpened or is very dull. On the Work Sharp E5, that’s the “Shape” cycle.
- Place the heel of the blade in the slot and keep it flat against the angle guide. Draw the knife slowly toward you until you reach the tip.
- Repeat on the other side. Alternate passes until the cycle timer finishes. The built-in timer helps prevent you from removing too much metal.
- Move to the refine cycle and repeat the same motions. This smooths and polishes the edge.
- Rinse and dry the knife. Test with the paper test.
Important tips:
- Use almost no downward pressure. Let the edge rest on the belt. Pushing down removes metal too aggressively.
- Never draw the tip of your knife past the halfway point on the belt. This can round over your tip.
- Practice on older, less expensive knives first before sharpening your nicer blades.
The base E5 unit handles most needs. For daily edge maintenance between sharpenings, pair it with a standalone honing rod like the Shun Premier 9-inch Combination Honing Steel, which works on both Western and Japanese-style blades.
Honing Steel vs. Stropping: Maintaining Your Edge Between Sharpenings
Sharpening creates the edge. Maintenance keeps it there. There are two main ways to maintain your edge between sharpenings, and they work differently.
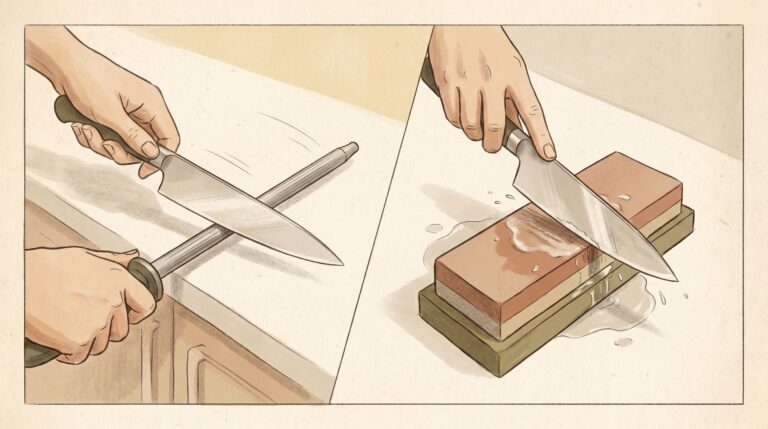
Using a honing steel
A honing steel (sometimes called a sharpening steel, though it doesn’t actually sharpen) is the metal or ceramic rod you’ve probably seen chefs use on TV.
- Hold the steel vertically with the tip resting on a stable surface like a cutting board.
- Place the heel of your knife against the top of the steel at roughly 15 to 20 degrees.
- Sweep the blade downward along the steel from heel to tip, maintaining the angle.
- Alternate sides for 4 to 6 passes total.
That’s it. Takes 30 seconds and should be part of your routine every time you cook.
Stropping: the alternative worth trying
A leather strop can be even more effective than a honing steel for maintaining kitchen knives, and most sharpening guides skip right past it.
KnifeCenter’s David C. Andersen uses a strop instead of a honing steel before cooking each day. The reason: a strop not only realigns the edge like a steel does, but with the right compound, it also polishes and refines it.
If you want to try stropping at home, you’ll need a strop (a flat piece of leather, often mounted on a paddle or bat) and some abrasive compound. Compounds come in different grits, typically color-coded: black (coarser), green (medium), white (fine), and plain leather for the final pass.
Draw the blade backward (spine first) across the loaded leather, alternating sides. 10 to 15 passes per side is usually enough.
For honing, a basic ceramic or steel rod is all you need. If you want to try stropping, the Marble’s compound assortment gives you multiple grits to experiment with.
Which Sharpening Method is Right for You?
Here’s how the methods compare at a glance:
| Method | Skill Level | Time | Edge Quality | Cost | Best For |
|---|---|---|---|---|---|
| Whetstone | Intermediate | 15-20 min | Excellent | $20-80 | Best overall results |
| Pull-through | Beginner | 1-2 min | Good | $10-40 | Quick touch-ups |
| Electric | Beginner | 3-5 min | Very good | $80-200 | Convenience |
| Honing steel | Beginner | 30 sec | Maintenance only | $15-50 | Daily upkeep |
| Strop | Intermediate | 1-2 min | Excellent finish | $15-50 | Final polish |
Our recommendation: If you’re new to sharpening, start with a pull-through or electric sharpener to get comfortable. As your skills grow, pick up a whetstone for the best possible edge. And no matter which sharpening method you use, hone or strop regularly between sessions. That single habit will keep your knives performing far longer between full sharpenings. These methods work on all your kitchen knives, from your 8-inch chef knife to your paring knife to the long, narrow blade of a carving knife.
Common Knife Sharpening Mistakes
Even experienced home cooks make these errors. Avoid them and your results will improve immediately.
- Using the wrong angle. Too steep and you’ll get a fragile edge that chips. Too shallow and the knife won’t bite into food. Stick to 20 degrees per side for Western knives, 15 for Japanese.
- Pressing too hard. Let the stone or abrasive do the work. Heavy pressure removes more metal than you need and makes it harder to hold a consistent angle.
- Skipping grits. Going from a coarse stone straight to your finest stone skips the refinement steps. Your edge will be sharp but rough. Step through your grits in order.
- Not checking for the burr. If you can’t feel the burr, you haven’t sharpened enough on that side. Keep going.
- Using a flat stone on serrated knives. Serrated edges need a round sharpening rod that fits into the individual serrations. A flat stone will destroy the teeth.
- Never maintaining between sharpenings. If you only sharpen and never hone, you’re letting the edge degrade far more than it needs to between sessions.
How to Keep Your Knives Sharp Longer
Sharpening restores the edge. These habits keep it there.
- Use a wood or plastic cutting board. Glass, ceramic, marble, and granite cutting boards are edge killers. They’re harder than your knife’s steel and will dull the blade almost immediately.
- Store knives properly. A knife block, magnetic strip, or blade guards all work well. Tossing knives loose in a drawer lets them bang against other utensils and dulls the edge.
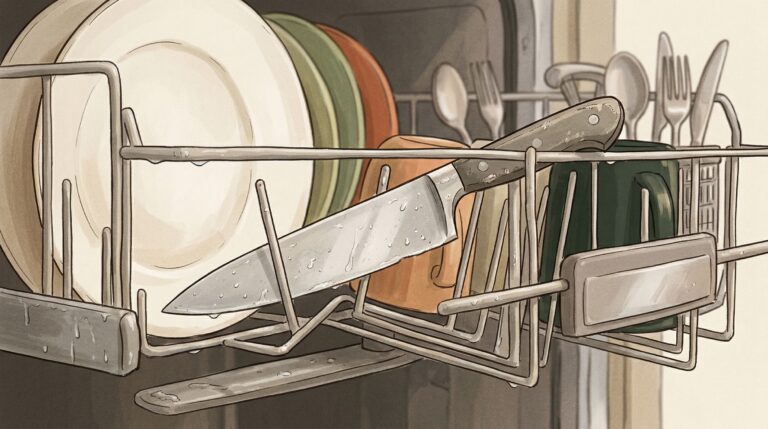
- Hand wash your knives. The dishwasher is rough on blades. The heat, detergent, and rattling against other items dulls and can even damage your knives. We wrote a full breakdown on why you should never put knives in the dishwasher.
- Hone or strop before each use. It takes 30 seconds and makes a noticeable difference.
- Don’t scrape food off the cutting board with the blade. Flip the knife over and use the spine instead. Dragging the edge sideways across the board rolls it over.
Frequently Asked Questions
How often should you sharpen kitchen knives?
Most home cooks should sharpen every 2 to 4 months, depending on how often you cook. If you hone regularly between sharpenings, you can go longer. You’ll know it’s time when honing no longer restores the edge and the paper test fails.
One exception worth flagging: a boning knife spends so much time scraping against bone that the edge rolls faster, so plan to sharpen it every 3 to 4 months rather than waiting for the paper test to fail.
Can you sharpen a serrated knife?
Yes, but not with a flat stone or pull-through sharpener. You need a round ceramic or diamond rod that fits inside each serration. Sharpen each tooth individually from the beveled side, then lightly pass the flat side across a fine stone to remove the burr. For a full breakdown of the serrated blade we recommend, see our bread knife guide.
Does cutting aluminum foil sharpen knives?
No. This is a common myth. Cutting foil might feel like it helps because it can remove tiny burrs on the edge, creating a temporarily cleaner cut. But it doesn’t actually sharpen the blade. Use a real sharpener.
Is WD-40 good for sharpening knives?
It’s not recommended. WD-40 is a solvent and water displacer, not a sharpening lubricant. For oil stones, use food-safe mineral oil. For water stones, use plain water. Both are cheap and widely available.
What angle should I sharpen my kitchen knife?
Most Western kitchen knives (like German-made knives from Wusthof or Henckels) should be sharpened at about 20 degrees per side. Japanese kitchen knives (like Shun or Global) are typically sharpened at 15 degrees per side. When in doubt, 20 degrees is a safe default for most home kitchen knives.
Can you over-sharpen a knife?
Technically yes, but it’s unlikely with normal use. Every time you sharpen, you remove a small amount of metal. Over many years, this can thin the blade.
But for the average home cook sharpening a few times a year, this isn’t something to worry about. Just don’t sharpen more often than you need to.
Looking for sharpening stones, honing steels, or strops? KnifeCenter carries all of the tools mentioned in this guide.